Save
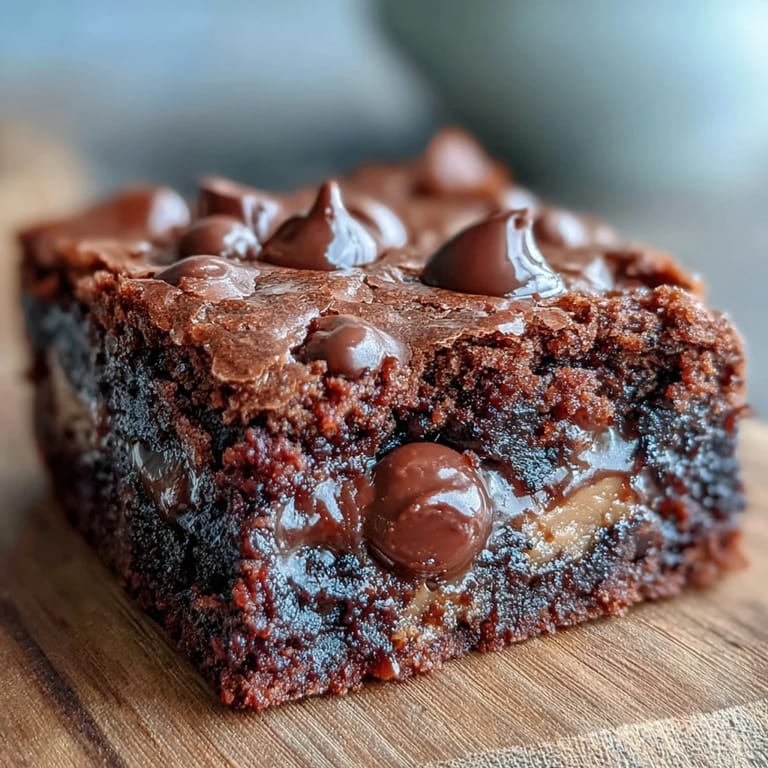
Save My kitchen smelled like a candy factory had exploded when I first attempted these brownies, and honestly, I wasn't even mad about it. A friend had casually mentioned burying peanut butter cups inside brownie batter like some kind of delicious treasure, and I became slightly obsessed with making it happen. The moment I pulled that pan from the oven and watched the chocolate-covered squares cool on the counter, I knew I'd found something worth repeating again and again.
I brought these to a potluck once, half-expecting them to disappear politely over the course of an evening. Instead, they were gone within twenty minutes, and someone asked for the recipe before I'd even finished setting them on the table. That's when I realized this wasn't just a nice brownie recipe—it was a conversation starter.
Ingredients
- All-purpose flour (1 cup / 125 g): Use the spoon-and-level method rather than scooping directly, because one extra tablespoon of flour can make your brownies dense instead of fudgy.
- Unsweetened cocoa powder (1 cup / 80 g): This is where the chocolate flavor lives, so don't reach for the sweetened kind or you'll throw off the balance.
- Baking powder (1/2 teaspoon): Just a tiny lift to keep these brownies from feeling like brick; skip it and you'll regret the density.
- Salt (1/2 teaspoon): It sounds small, but salt makes the chocolate sing and keeps everything from tasting one-note.
- Unsalted butter, melted (1 cup / 225 g): Melted butter creates that silky brownie texture; cold butter won't incorporate the same way.
- Granulated sugar (2 cups / 400 g): This gives both sweetness and structure, so measure carefully.
- Large eggs (4): Room temperature eggs mix in smoothly and help bind everything together without creating lumps.
- Vanilla extract (2 teaspoons): A small but mighty addition that deepens the chocolate flavor in ways that surprise people.
- Semi-sweet chocolate chips (1 cup / 175 g): Extra chocolate distributed throughout makes every bite feel indulgent, so don't skip them.
- Mini peanut butter cups (16) or standard (8 halved): These are the stars of the show, so choose ones you'd actually eat straight from the wrapper.
Tired of Takeout? 🥡
Get 10 meals you can make faster than delivery arrives. Seriously.
One email. No spam. Unsubscribe anytime.
Instructions
- Prepare your pan:
- Preheat your oven to 350°F and line a 9x13-inch pan with parchment paper, leaving enough overhang on the sides that you can grab it later like a handle. This step saves you from frustrated brownie-scraping and makes cleanup feel like a gift to future you.
- Combine the dry ingredients:
- Whisk together your flour, cocoa powder, baking powder, and salt in a medium bowl until everything looks evenly mixed. This prevents cocoa streaks and ensures the baking powder distributes so you don't get weird pockets of bitterness.
- Create the wet base:
- Pour your melted butter into a large bowl, add sugar, and whisk until the mixture looks shiny and slightly thick. You're looking for that glossy texture that signals the sugar is breaking down and coating everything properly.
- Add your eggs carefully:
- Beat in eggs one at a time, stirring well between each addition so they actually incorporate rather than creating slicks of separated egg white. After all four are in, stir in the vanilla and let yourself appreciate how much richer this smells already.
- Fold in the dry goods:
- Add your flour mixture to the wet ingredients and fold gently until just combined, resisting the urge to overmix because that's what turns brownies into tough hockey pucks. Stop folding while you can still see a few flour streaks—your future texture will thank you.
- Add chocolate chips:
- Gently fold in your chocolate chips so they're distributed without crushing them into sad little fragments. This batter should look rich, dark, and studded with chocolate promises.
- Layer with peanut butter cup magic:
- Spread half your batter into the prepared pan, smoothing it as evenly as you can with a spatula. Arrange your peanut butter cups in an even grid over the batter, then carefully spoon and spread the remaining batter over the top, making sure to cover each cup completely so they don't poke through and burn.
- Bake until perfect:
- Bake for 28 to 32 minutes, checking around the 28-minute mark by inserting a toothpick into the center—it should come out with a few moist crumbs clinging to it, not completely clean and not covered in batter. The top should look set and slightly cracked, signaling that fudgy interior is waiting underneath.
- Cool with patience:
- Let the brownies cool completely in the pan before trying to lift them out, which usually takes at least an hour if you can wait that long. Once cooled, use that parchment overhang to lift the entire block out, then slice into squares and prepare for people to lose their minds.
 Save
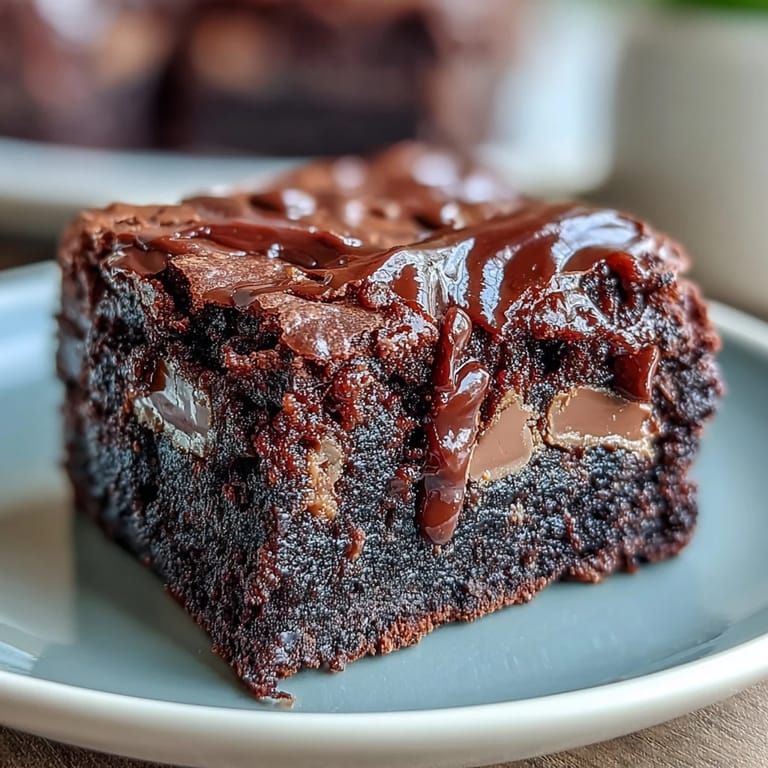
Save There's something almost magical about the moment someone takes their first bite and realizes there's a whole peanut butter cup hiding in the middle. I watched a coworker's eyes go wide when they hit that gooey peanut butter center, and suddenly this wasn't just a dessert—it was an experience I'd created.
The Science of Fudgy Brownies
Fudgy brownies live in this delicate zone where you're not quite baking them long enough to set completely, which sounds risky but actually creates magic. The key is understanding that the carryover cooking continues as they cool, so that toothpick with moist crumbs is your target, not the clean toothpick you might expect. It took me a few batches to trust this process, but now it's automatic.
Customization Without Guilt
The beauty of this recipe is that it's already so rich and crowd-pleasing that you can play around without fear of ruining it. I've swapped peanut butter cups for crushed candy bars, drizzled melted peanut butter over the top after cooling, and even pressed mini chocolate chips into the surface before baking for extra crunch. The formula is flexible enough to become your own without losing its soul.
Serving and Storage Secrets
These brownies are honestly perfect at room temperature, but if you're feeling fancy, a quick pass under warm water on your knife between cuts prevents crumbling and makes plating feel professional. Store them in an airtight container at room temperature for up to five days, though they'll probably vanish much faster than that.
- Serve these warm with vanilla ice cream if you want people to actually remember your name.
- A drizzle of melted chocolate over the cooled brownies adds visual drama and tastes incredible.
- These freeze beautifully for up to three months, so you can bake ahead and feel like a genius when you pull them out.
 Save
Save These brownies have become the kind of recipe I make without consulting the instructions anymore, the one that lives in my hands and muscle memory. If you're looking for something that tastes like you spent hours in the kitchen but actually takes less than an hour from start to slice, this is your answer.
Recipe FAQs
- → What baking pan size works best?
A 9x13-inch pan provides ideal thickness and even baking.
- → Can I substitute peanut butter cups?
Yes, caramel candies or chocolate hazelnut spread work well for variation.
- → How do I achieve fudgy brownies?
Use melted butter and avoid overmixing the batter to keep the texture dense and moist.
- → Should the brownies cool before slicing?
Allow them to cool completely for clean, neat squares and easier removal from the pan.
- → Any tips for extra indulgence?
Drizzle melted chocolate or peanut butter over cooled brownies for added richness.