 Save
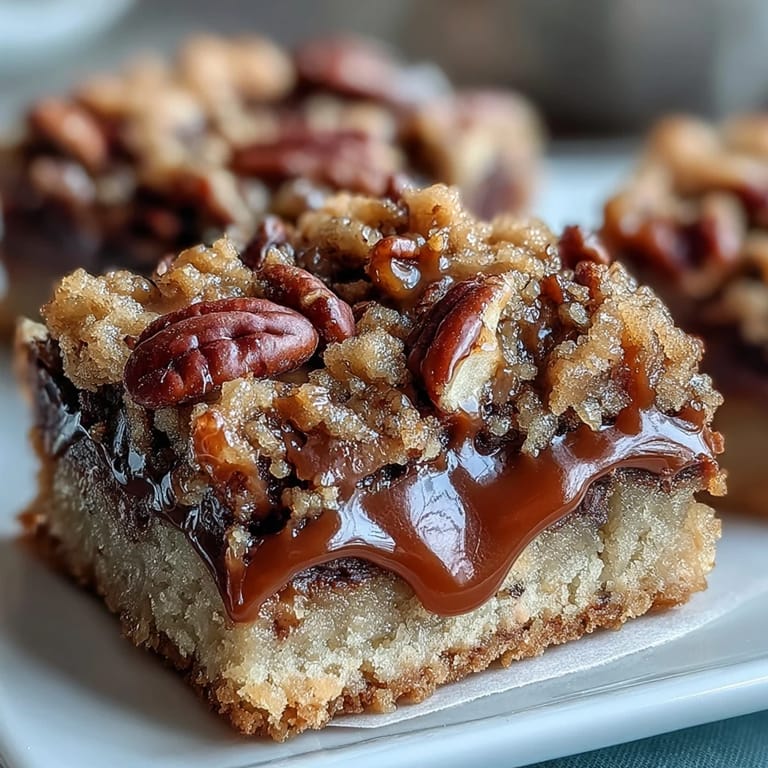
Save The smell of caramel bubbling on the stove is what I associate most with weekend baking sessions. I made these bars on a rainy Saturday when I had promised dessert but had no real plan, just a bag of pecans and leftover caramel sauce in the fridge. The oats gave the bars a chewy backbone that surprised me, and the chocolate melted into every corner while the pan cooled. My kitchen smelled like a candy shop for hours. That batch disappeared faster than anything I had baked in months.
I brought a pan of these to a potluck once, cut into generous squares and stacked in a tin. A friend asked if I had bought them from a bakery because the layers looked too perfect to be homemade. I laughed and admitted the caramel had pooled unevenly in one corner, but nobody seemed to notice once they tasted the buttery crumble on top. That night I learned that a little mess in the kitchen often leads to the best compliments at the table.
Ingredients
- All-purpose flour: Forms the tender base that holds everything together without turning tough, especially when mixed just until crumbly.
- Rolled oats: Add chew and texture to both the crust and topping, and they toast beautifully in the oven for a nutty aroma.
- Brown sugar: Brings moisture and a hint of molasses that deepens the caramel flavor throughout the bars.
- Granulated sugar: Balances the brown sugar and helps the crumb topping crisp up as it bakes.
- Unsalted butter, melted: Binds the crumble and keeps the crust from drying out, use it warm for easier mixing.
- Salt: A small amount sharpens the sweetness and makes the caramel taste richer.
- Baking soda: Lightens the crumb mixture just enough to prevent it from becoming dense or hard.
- Semi-sweet chocolate chips: Melt into glossy pools when poured over the warm crust, creating fudgy pockets between layers.
- Chopped pecans: Toast them lightly beforehand if you want extra depth, or use them raw for a softer crunch.
- Caramel sauce: Whether homemade or store-bought, it should be thick enough to cling to the chocolate and nuts without running off the edges.
- Heavy cream: Loosens the caramel just enough to pour smoothly and adds a silky finish to every spoonful.
Tired of Takeout? 🥡
Get 10 meals you can make faster than delivery arrives. Seriously.
One email. No spam. Unsubscribe anytime.
Instructions
- Prep the pan and oven:
- Preheat your oven to 350°F and grease a 9x9-inch pan generously with butter, or line it with parchment for easy lifting later. This step saves you from prying bars out with a spatula.
- Mix the crumb base:
- Combine flour, oats, both sugars, melted butter, salt, and baking soda in a large bowl until the mixture looks like wet sand. Reserve 1 cup of this for the topping and press the rest firmly into the bottom of your pan.
- Bake the crust:
- Slide the pan into the oven for 10 minutes until the edges just start to turn golden. This partial bake sets the base so it does not get soggy under the caramel.
- Warm the caramel:
- While the crust bakes, heat caramel sauce and heavy cream in a small saucepan over medium-low, stirring constantly until smooth. Remove it from the heat as soon as it is combined.
- Layer the filling:
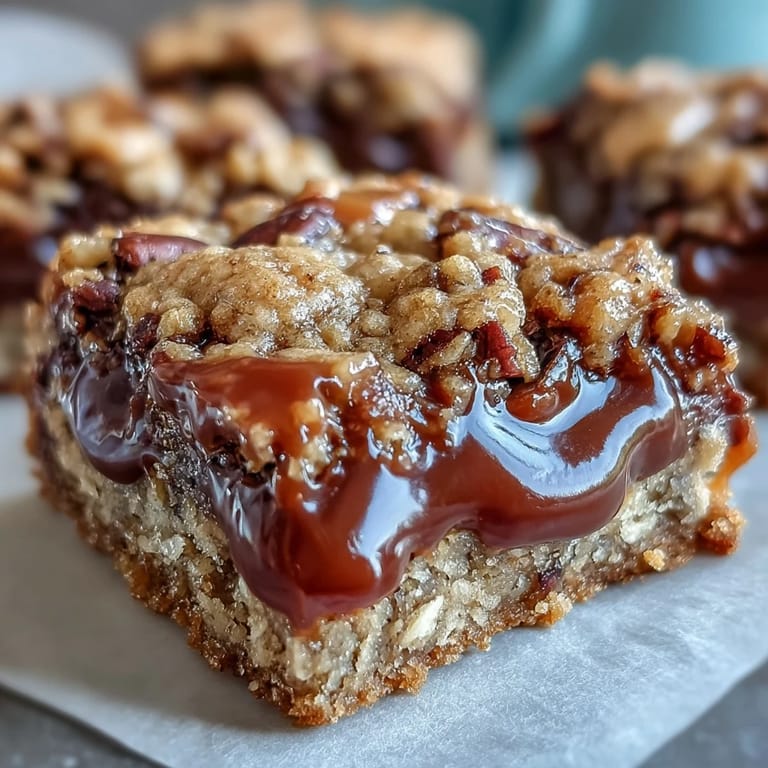
- Pull the crust from the oven and immediately scatter chocolate chips over the hot surface, then add the chopped pecans. Pour the warm caramel evenly over everything, letting it seep into the gaps.
- Add the crumb topping:
- Sprinkle the reserved crumb mixture over the caramel layer, covering as much as you can without pressing down. The loose crumbs will bake into golden nuggets.
- Finish baking:
- Return the pan to the oven and bake for 15 to 20 minutes until the topping turns a deep golden brown. The kitchen will smell like toasted sugar and butter.
- Cool completely:
- Set the pan on a wire rack and let it cool all the way to room temperature before cutting. Patience here prevents the caramel from oozing out when you slice.
 Save
Save One evening I served these bars after dinner with vanilla ice cream on the side, and the contrast between cold cream and warm caramel turned a simple dessert into something guests asked about for weeks. I have made them for birthdays, bake sales, and quiet nights when I needed something sweet without much fuss. They have become my answer to the question of what to bake when you want to impress without spending all day in the kitchen.
Storage and Shelf Life
These bars stay soft and chewy in an airtight container at room temperature for up to a week, though they rarely last that long in my house. I stack them with parchment between layers to prevent sticking, and sometimes I tuck the container in the fridge if the weather is warm and the caramel starts to soften. Cold bars have a firmer texture that some people prefer, especially if you like your desserts less gooey. If you want to freeze them, wrap individual squares in plastic and store them in a freezer bag for up to three months.
Variations and Substitutions
I have swapped pecans for walnuts when that is what I had on hand, and the bars turned out just as good with a slightly earthier flavor. If you want a salted caramel version, sprinkle flaky sea salt over the caramel layer before adding the crumb topping. Dark chocolate chips work beautifully if you prefer less sweetness, and I once stirred a handful of toffee bits into the crumb mixture for extra crunch. You can also use quick oats instead of rolled, though the texture will be a bit less chewy and more tender.
Serving Suggestions
I like to cut these into small squares and serve them on a platter with coffee after a big meal, but they also work as a midday treat with cold milk. Warm them for a few seconds in the microwave and the chocolate gets melty again, which is perfect if you are in the mood for something indulgent. A drizzle of extra melted chocolate on top before serving makes them look bakery-worthy, and a dollop of whipped cream on the side never hurts.
- Serve with a scoop of vanilla or caramel ice cream for a dessert that feels special without extra effort.
- Pack them in a tin for gifting, they travel well and look generous stacked in rows.
- Pair with espresso or hot chocolate to balance the sweetness and highlight the caramel notes.
 Save
Save These bars have a way of turning an ordinary afternoon into something a little more special, whether you are baking for a crowd or just treating yourself. I hope they become a favorite in your kitchen the way they have in mine.
Recipe FAQs
- → Can I use homemade caramel sauce instead of store-bought?
Yes, homemade caramel sauce works beautifully. Simply combine it with heavy cream as directed and ensure it's smooth before pouring over the chocolate and pecans.
- → How do I prevent the bars from sticking to the pan?
Line your 9x9-inch pan with parchment paper, leaving overhang on two sides. This allows you to lift the entire batch out before cutting into clean squares.
- → Can I substitute the pecans with other nuts?
Absolutely. Walnuts and almonds work well as substitutes. Toast them lightly before adding for enhanced flavor and crunch.
- → How long should I let the bars cool before cutting?
Allow the bars to cool completely in the pan for at least 30 minutes. This helps the caramel set and ensures clean cuts without crumbling.
- → What's the best way to store these bars?
Store in an airtight container at room temperature for up to one week. Layer parchment paper between stacked bars to prevent sticking.
- → Can I make these bars gluten-free?
Yes, substitute the all-purpose flour with a 1:1 gluten-free baking flour blend and ensure your oats are certified gluten-free.